If you’ve ever felt intimidated by baking homemade bread—especially gluten-free bread—this recipe is for you. This Easy Gluten-Free Artisan Bread is simple, reliable, and requires very little hands-on work. There’s no kneading, no sourdough starter, and no complicated techniques involved.
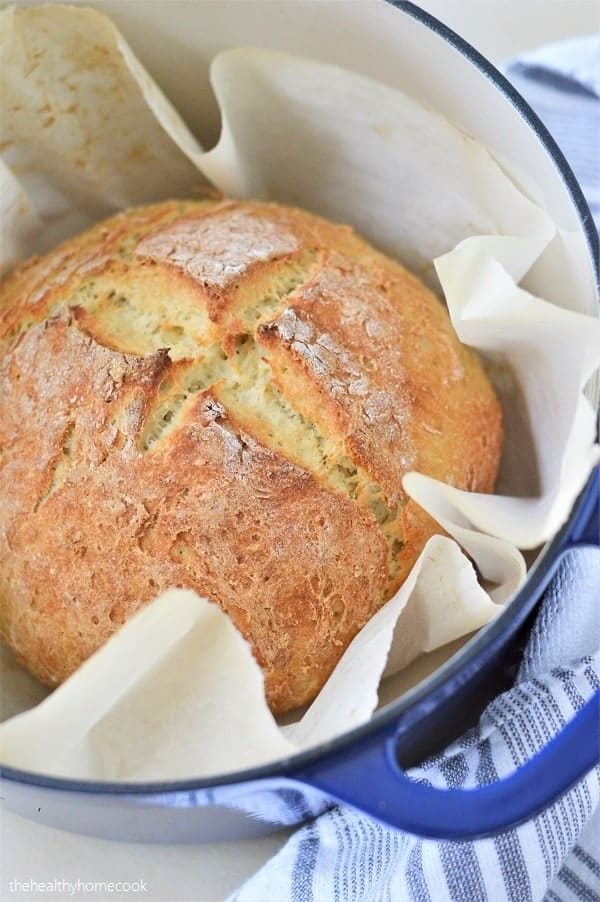
Despite how easy it is, the final result looks and tastes like something straight from an artisan bakery. The loaf has a golden, crusty exterior with a soft, tender, and slightly chewy inside. It’s perfect for soups, sandwiches, toast, or simply dipped in olive oil.
Why You’ll Love This Recipe
- 100% gluten-free
- No kneading required
- No long proofing times
- No sourdough starter
- Beginner-friendly
- Crispy crust + soft interior
- Made with simple pantry ingredients
This is the kind of recipe you’ll find yourself making again and again.
Do I Need to Preheat the Dutch Oven?
Yes! Preheating your Dutch oven is very important for this recipe. A hot Dutch oven traps steam during baking, which helps create that beautiful crispy artisan crust while keeping the inside moist and fluffy.
Always preheat the Dutch oven with the lid on while the oven is heating.
Ingredients You’ll Need
Dry Ingredients
- 3½ cups gluten-free all-purpose flour
- 1 packet (2¼ teaspoons) active dry yeast
- 1 tablespoon xanthan gum
- If your gluten-free flour already contains xanthan gum, use only 2 teaspoons
- 2 teaspoons salt
- 1 tablespoon sugar
- 1½ teaspoons baking powder
Wet Ingredients
- 2 large eggs (room temperature)
- 1½ teaspoons apple cider vinegar
- 1⅔ cups warm water (not hot)
How to Make Gluten-Free Artisan Bread
Step 1: Activate the Yeast
In a medium bowl, combine the warm water, sugar, and active dry yeast. Whisk gently until dissolved.
Let the mixture sit for 10 minutes until it becomes foamy and bubbly. This step ensures your yeast is active.
Step 2: Mix the Dough
In a large mixing bowl, add:
- Gluten-free flour
- Salt
- Baking powder
- Xanthan gum
Pour in the yeast mixture, then add the eggs and apple cider vinegar.
Using a wooden spoon or your hands, mix everything until a thick, sticky dough forms.
You do not need a stand mixer or dough hook for this recipe.
Step 3: Rest the Dough
Cover the bowl with plastic wrap or a clean kitchen towel.
Let the dough rest on the counter for about 50 minutes.
⚠️ Important: Gluten-free dough will not double in size like regular wheat bread. A slight rise is completely normal.
Step 4: Preheat the Oven
Preheat your oven to 450°F (230°C).
Place your Dutch oven (with lid) inside the oven while it preheats.
This step is essential for creating a bakery-style crust.
Step 5: Shape the Dough
Place a large piece of parchment paper on your counter and lightly dust it with gluten-free flour.
Transfer the dough onto the parchment paper and gently shape it into a round loaf. The dough will be slightly sticky—this is normal.
Use a sharp knife to make 2–3 small slashes on the top of the dough.
Step 6: Bake the Bread
Carefully remove the hot Dutch oven from the oven.
Lift the parchment paper and place the dough directly into the Dutch oven.
Cover with the lid and bake for 45 minutes.
After 45 minutes, remove the lid and bake for an additional 5 minutes until the crust is golden and crisp.
Step 7: Cool Completely
Remove the bread from the Dutch oven and place it on a wire rack.
Allow it to cool completely before slicing.
Cutting too early can make the bread gummy inside.
Storage Tips
- Store at room temperature in an airtight container for 2 days
- Refrigerate for up to 5 days
- Freeze slices for up to 2 months
To reheat, toast or warm in the oven for best texture.
Serving Ideas
- Serve with soups and stews
- Use for hearty sandwiches
- Toast for breakfast with butter or jam
- Dip in olive oil or balsamic vinegar
Final Thoughts
This Easy Gluten-Free Artisan Bread proves that gluten-free baking doesn’t have to be complicated. With minimal effort and simple ingredients, you can enjoy fresh, homemade artisan bread anytime—no bakery trips needed.
Once you try it, this recipe will quickly become a staple in your kitchen.
