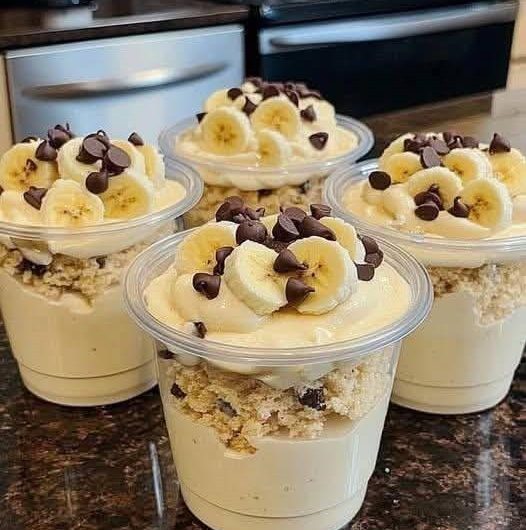
Some desserts never go out of style, and banana pudding is one of them. It combines smooth vanilla pudding, fresh bananas, whipped cream, and crisp vanilla wafers that slowly soften into a cake-like texture after chilling. Every spoonful is creamy, light, and packed with comforting flavors that make this dessert perfect for any season.
One of the best things about this recipe is how simple it is to prepare. There is no baking involved, no complicated techniques, and only a handful of ingredients are needed. Although the preparation is easy, the finished dessert tastes like something made by a professional bakery. It has beautiful layers, a rich but airy texture, and just the right balance of sweetness.
This dessert is ideal for family dinners, birthdays, potlucks, holiday celebrations, or even weekend treats. Since it is prepared in advance, it allows plenty of time to focus on other dishes while the pudding chills in the refrigerator.
Why This Recipe Works
What makes this banana pudding so special is the combination of textures. The pudding is smooth and creamy, the bananas add natural sweetness, and the vanilla wafers absorb moisture while still keeping a slight bite. After several hours of chilling, all of these layers blend together into a dessert that is rich without feeling heavy.
Unlike baked desserts that require constant attention, this recipe simply needs enough chilling time. Most of the work is done by the refrigerator as the flavors develop and the wafers soften into delicate layers.
Ingredients That Make the Difference
Even though this dessert uses only a few ingredients, each one plays an important role in creating the perfect consistency and flavor.
Sweetened Condensed Milk
Sweetened condensed milk gives the pudding its smooth texture and creamy sweetness. It blends easily with the pudding mix and creates a rich base without becoming overly heavy.
Ice-Cold Water
Cold water helps the pudding mix thicken properly. Using very cold water ensures the pudding develops the right consistency during refrigeration.
Instant Vanilla Pudding Mix
Instant vanilla pudding is the heart of this recipe. It provides classic vanilla flavor while helping the mixture become thick enough to support the layers.
Allowing the pudding mixture to chill before combining it with the whipped cream makes a noticeable difference in texture.
Heavy Whipping Cream
Freshly whipped cream transforms the pudding into an incredibly light filling. Instead of feeling dense, the finished dessert becomes fluffy and silky.
Whipping the cream until stiff peaks form creates enough structure to hold each layer beautifully without collapsing.
Bananas
Fresh bananas provide natural sweetness and soft texture.
Choosing bananas that are just ripe works best. They should have a bright yellow peel with very few brown spots. Slightly firm bananas hold their shape better during chilling and stay fresh longer inside the pudding.
Very ripe bananas become soft quickly and may release extra moisture into the dessert.
Vanilla Wafers
Vanilla wafers are much more than a garnish. During refrigeration they gradually absorb moisture from the pudding, becoming tender while still maintaining enough structure to create beautiful layers.
Their mild vanilla flavor pairs perfectly with the bananas and creamy filling.
Preparing the Pudding Base
The pudding mixture is the foundation of the entire dessert, so taking a few extra minutes to prepare it correctly makes all the difference.
Start by whisking the sweetened condensed milk together with ice-cold water until completely smooth. Once combined, sprinkle in the instant vanilla pudding mix and whisk until no dry powder remains.
The mixture will still look fairly thin at this stage, but that is completely normal.
Cover the bowl tightly and refrigerate it for three to four hours.
During this time, the pudding thickens into a smooth, creamy consistency that is easy to fold with whipped cream.
Avoid rushing this step because properly chilled pudding creates stable layers later on.
Whipping the Cream
While the pudding chills, the next important component is freshly whipped cream.
Pour the heavy whipping cream into a chilled mixing bowl and beat until stiff peaks form.
The cream should hold its shape firmly without becoming grainy or overmixed.
Properly whipped cream creates a light texture that makes every spoonful feel airy instead of dense.
Once whipped, gently fold it into the chilled pudding mixture using a spatula.
Instead of stirring vigorously, use slow folding motions. This keeps as much air as possible inside the whipped cream, resulting in a soft and fluffy filling.
ontinue folding until the mixture becomes completely smooth with no visible streaks remaining.
Building Beautiful Layers
Layering is one of the most enjoyable parts of making this dessert.
Choose a deep serving dish that allows enough space for multiple layers.
Begin with a thin layer of the pudding mixture spread evenly across the bottom. This prevents the first layer of wafers from sliding around while serving.
Arrange the vanilla wafers in a single layer, placing them close together.
Next, cover the wafers with an even layer of sliced bananas.
Spread another generous layer of the pudding mixture over the bananas, making sure every slice is completely covered.
Repeat the layers one more time using wafers, bananas, and pudding until the dish is filled.
Finish with a thick, smooth layer of the creamy pudding mixture across the top.
This final layer creates a beautiful presentation while sealing the bananas underneath, helping them stay fresher during refrigeration.
At this stage, the dessert already looks inviting, but it still needs time for the flavors and textures to come together.
Description
This homemade banana pudding is a rich, creamy, and refreshing no-bake dessert made with layers of fluffy vanilla pudding, freshly whipped cream, sliced bananas, and vanilla wafers. As the dessert chills, the wafers soften into a cake-like texture while the flavors blend beautifully, creating a smooth and delicious treat that is perfect for family gatherings, celebrations, or make-ahead desserts.
Recipe Details
Prep Time: 25 minutes
First Chill Time (Pudding): 3–4 hours
Second Chill Time (Assembled Dessert): 7–12 hours
Total Time: Approximately 11–16 hours
Servings: 12–15
Difficulty: Easy
Course: Dessert
Method: No-Bake
Ingredients
- 396 g (14 oz) sweetened condensed milk
- 1½ cups ice-cold water
- 96 g (1 box / 3.4 oz) instant vanilla pudding mix
- 3 cups heavy whipping cream (35%)
- 4–6 bananas, sliced (about 4 cups)
- 680 g vanilla wafers (2 × 12-oz boxes)
Instructions
Step 1 – Prepare the Pudding
- In a large mixing bowl, whisk together the sweetened condensed milk and the ice-cold water until completely blended.
- Add the instant vanilla pudding mix and continue whisking until the mixture becomes smooth and free of lumps.
- Cover the bowl tightly and refrigerate for 3 to 4 hours, allowing the pudding to become thick and creamy.
Step 2 – Whip the Cream
- Pour the heavy whipping cream into a chilled mixing bowl.
- Beat with an electric mixer until stiff peaks form. The whipped cream should hold its shape while remaining smooth and fluffy.
Step 3 – Combine the Mixtures
Remove the chilled pudding from the refrigerator.
Using a spatula, gently fold the whipped cream into the pudding mixture until fully combined.
Continue folding just until no white streaks remain. Avoid overmixing to keep the filling light and airy.
Step 4 – Assemble the Dessert
Use an 8 × 12-inch serving dish that is at least 2 inches deep.
Spread a thin layer of the pudding mixture over the bottom of the dish.
Arrange a layer of vanilla wafers over the cream.
Add an even layer of sliced bananas.
Spread another layer of the pudding mixture over the bananas.
Repeat the layers of wafers, bananas, and pudding one more time.
Finish with a generous layer of the pudding mixture, smoothing the top with a spatula.
If desired, sprinkle crumbled vanilla wafers over the surface before chilling.
Step 5 – Chill
Cover the dish tightly with plastic wrap.
Refrigerate for 7 to 12 hours so the wafers soften and the layers set properly.
This resting time is essential for achieving the signature creamy texture.
Step 6 – Serve
Just before serving, garnish the top with freshly sliced bananas and a few crushed vanilla wafers for added texture.
Serve chilled by scooping generous portions into dessert bowls.
Notes
- Bananas that are just ripe work best because they stay firm and maintain their color longer.
- Very ripe bananas may become soft during refrigeration.
- Chilling the pudding before folding in the whipped cream helps create a thicker and more stable filling.
- Do not shorten the final chilling time. The vanilla wafers need several hours to soften and develop their signature texture.
- The bananas inside the pudding stay fresher because they are covered by the cream.
- Fresh banana slices used for garnish should be added immediately before serving to reduce browning.
- The dessert tastes best within 24 hours, although it can be enjoyed for up to 48 hours when refrigerated.
- Using a different size serving dish may slightly change the number of layers, but the ingredients remain the same.
Storage
- Store covered in the refrigerator.
- Best enjoyed within 24 hours for the freshest flavor and texture.
- Leftovers can be refrigerated for up to 48 hours.
- Do not freeze, as the pudding and bananas may lose their creamy consistency after thawing.


