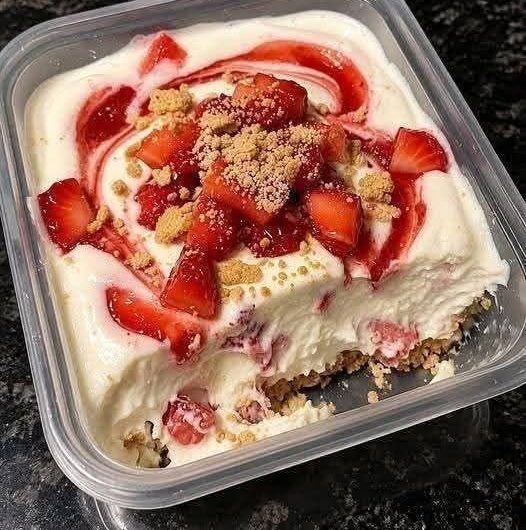
This homemade strawberry cheesecake combines three classic dessert layers in one impressive recipe: a buttery graham cracker crust, a smooth cream cheese filling, and a glossy homemade strawberry topping. Its rich yet refreshing flavor makes it suitable for birthdays, family dinners, holiday celebrations, summer parties, and other special occasions. Although cheesecake can seem difficult to prepare, this low-temperature baking method keeps the process manageable and does not require a water bath.
Unlike cheesecake recipes baked quickly at a high temperature, this version cooks slowly at 200°F. The gentle heat allows the filling to set evenly while maintaining its soft, creamy texture. After baking, the cheesecake cools gradually inside the oven before being refrigerated. This controlled process reduces sudden temperature changes, helping protect the surface against deep cracks, sinking, and uneven edges.
Why This Strawberry Cheesecake Recipe Works
The appeal of this easy strawberry cheesecake comes from the contrast between its layers. The graham cracker crust provides a firm, slightly crisp base with buttery caramel notes from the brown sugar. Above it sits a thick and silky cheesecake filling flavored with vanilla and fresh lemon juice. The strawberry sauce finishes the dessert with natural fruit flavor, gentle acidity, and an attractive red color.
This is also a convenient strawberry cheesecake recipe without a water bath. Traditional water baths can help regulate heat, but they require extra wrapping and careful handling. Water may sometimes leak into a springform pan and soften the crust. Here, the very low oven temperature performs a similar function by allowing the filling to bake gently without exposing the pan to water.
The Three Main Cheesecake Layers
The first layer is a simple graham cracker cheesecake crust made with crackers, melted butter, brown sugar, and vanilla. Processing the crackers into fine crumbs helps create a neat, stable base. When the crumbs are pressed firmly into a greased springform pan and briefly baked, the butter and sugar bind them together and develop a richer toasted flavor.
The second layer is the creamy cheesecake filling. Cream cheese gives the dessert its distinctive richness, while sweetened condensed milk supplies sweetness and a smooth consistency. Sour cream adds moisture and a light tang, and lemon juice provides brightness without turning the dessert into a lemon cheesecake. Cornstarch supports the filling so that it sets properly while remaining tender.
The final layer is a homemade strawberry topping prepared with two different cuts of fruit. Diced strawberries cook down to create a thick, spoonable sauce, while strawberry halves are added near the end. This method produces a balanced topping containing both soft strawberry sauce and larger fruit pieces instead of turning every strawberry into a completely smooth purée.
Preparing Ingredients for a Smooth Filling
Room-temperature ingredients are essential when making a smooth baked cheesecake. Cold cream cheese is firm and difficult to blend, which can leave small lumps throughout the batter. Letting the cream cheese soften before mixing allows it to combine evenly with the condensed milk, sour cream, flavorings, and cornstarch. The sour cream and eggs should also be brought to room temperature.
Softened ingredients do not require aggressive beating, so less air becomes trapped inside the mixture. Too much air may cause the filling to expand significantly in the oven and then fall while cooling. This change in volume is one of the reasons baked cheesecake can crack. Gentle, controlled mixing is therefore just as important as using the correct baking temperature.
How to Make a Graham Cracker Crust
Begin by preheating the oven to 325°F. Add the graham crackers and brown sugar to a food processor, then pulse them until they have a fine, even texture. Large cracker pieces may make the crust difficult to cut, so process the mixture thoroughly. Add the melted butter and vanilla, and pulse again until all the crumbs look evenly moistened.
Grease the inside of a 9-inch springform pan, including its base and sides. A round piece of parchment paper may be placed on the bottom if easier removal is desired. Transfer the crumb mixture to the pan, spread it evenly, and press it firmly across the base. Bring a small amount up the sides to form a shallow border.
The bottom of a flat measuring cup is useful for compacting the graham cracker crumbs. Apply steady pressure so that there are no loose areas or noticeable gaps. Bake the crust for seven minutes, and then remove it from the oven to cool slightly. Reduce the oven temperature to 200°F before beginning the long, gentle cheesecake bake.
Making the Creamy Cheesecake Filling
Place the softened cream cheese in a large bowl with the sweetened condensed milk, room-temperature sour cream, vanilla extract, freshly squeezed lemon juice, salt, and cornstarch. Beat these ingredients with a hand mixer until the filling looks completely smooth. Scrape the bottom and sides of the bowl when necessary so that no pieces of cream cheese remain hidden.
Add the room-temperature eggs one at a time. Mix briefly after each addition and stop as soon as the egg is incorporated. The batter does not need prolonged beating at this point because the ingredients were already smoothed before the eggs were introduced. Pour the completed filling over the prepared crust and gently level the top if needed.
Tapping the filled pan firmly against the counter can damage the crust or introduce unnecessary movement, so handle it carefully. If a few visible air bubbles appear on top, they can be broken gently with the tip of a clean knife or toothpick. The cheesecake is now ready for its slow bake on the oven’s bottom rack.
Baking Cheesecake Without a Water Bath
Place the springform pan on the bottom rack of the oven, which should now be at 200°F. Bake the cheesecake for approximately 90 to 120 minutes. Avoid opening the oven during the first 90 minutes. Each time the door opens, heat escapes and the temperature changes, potentially interrupting the gentle and even baking process.
After 90 minutes, carefully open the door and lightly nudge the pan. The outer area should appear set, while the center should move with a small, controlled jiggle. If the entire filling moves loosely, it needs additional baking time. Continue cooking in 15-minute intervals and check after each interval until only the middle has a slight wobble.
Do not wait for the center to become completely firm in the oven. Cheesecake continues setting as it cools, and baking until every part looks solid may result in a dry or dense texture. A small jiggle in the middle is expected. The slow heat, residual warmth, and extended refrigeration will complete the setting process without overcooking the filling.
Cooling Cheesecake to Help Prevent Cracks
When the cheesecake reaches the correct stage, turn off the oven and open its door approximately eight inches. Leave the cheesecake inside for at least 20 minutes. If desired, open the door fully and continue cooling it in the oven for another 10 minutes. This gradual transition protects the warm filling against a sudden drop in temperature.
Rapid cooling may cause the cheesecake to contract abruptly, increasing the possibility of cracks or a sunken center. Slow cooling allows the filling to settle more gently. Once it has cooled completely, cover the pan and transfer it to the refrigerator. Do not add the warm strawberry topping or attempt to cut the cheesecake before it is thoroughly chilled.
Refrigerate the dessert for at least four hours. Chilling gives the filling enough time to develop its final texture and become firm enough for neat slices. Preparing it the day before serving can make the process even more convenient. The long resting period also allows the vanilla, lemon, cream cheese, and sour cream flavors to blend beautifully.
How to Make Homemade Strawberry Topping
Hull the strawberries and divide them into two equal portions. Dice one half into small pieces and cut the remaining strawberries into halves. Put the diced fruit in a small saucepan with the lemon juice, sugar, and vanilla extract. Cook over medium-low heat for five to eight minutes, stirring occasionally as the strawberries soften and release their juices.
Combine the cornstarch with two tablespoons of water in a separate small bowl. Stir until smooth, making sure no dry cornstarch remains. Pour this slurry into the cooked strawberry mixture and stir well. Continue cooking for approximately two minutes, or until the sauce becomes noticeably thicker and can lightly coat the back of a spoon.
Add the halved strawberries to the thickened sauce and toss them gently until coated. Turn off the heat immediately so the larger pieces retain some of their shape and fresh texture. Set the topping aside to cool. Adding it to a cold cheesecake while still hot could soften the surface, so both components should be properly cooled before assembly.
Assembling and Serving Strawberry Cheesecake
Once the cheesecake has chilled completely, carefully release the sides of the springform pan. Spoon the cooled strawberry topping over the surface. It may be spread across the entire cheesecake or arranged mainly in the center to leave a visible cream cheese border. Either presentation will show the attractive contrast between the pale filling and bright strawberry sauce.
For clean cheesecake slices, use a long, sharp knife. Dip the blade in warm water, dry it, and cut through the dessert with steady pressure. Wipe the knife after every slice to prevent the strawberry sauce and filling from collecting along the edges. This simple technique creates a cleaner presentation, particularly when the cheesecake is being served at a celebration.
Serve the cheesecake directly from the refrigerator for the firmest texture. If a slightly softer and creamier consistency is preferred, let individual slices stand briefly at room temperature before eating. Avoid leaving the complete dessert unrefrigerated for extended periods because the filling contains cream cheese, sour cream, condensed milk, and eggs.
Notes for the Best Strawberry Cheesecake
Do not substitute cold cream cheese directly from the refrigerator if you want a lump-free batter. Plan ahead and allow the refrigerated filling ingredients to reach room temperature naturally. Also avoid overmixing once the eggs have been added. These two precautions help produce a smooth filling without introducing excessive air into the cheesecake mixture.
Keep the oven closed throughout the first 90 minutes of baking. When checking the cheesecake later, look for firm edges and a gently moving center instead of expecting the entire surface to become rigid. A cheesecake that is completely firm while still inside the oven may be overbaked by the time it has finished cooling and chilling.
Measure the cornstarch carefully in both the filling and strawberry sauce. In the cheesecake, it provides stability; in the topping, it thickens the released strawberry juices. The teaspoon of cornstarch used for the topping must first be mixed with two tablespoons of water. Adding dry cornstarch directly to hot fruit can create stubborn white lumps.
Making Strawberry Cheesecake Ahead
This make-ahead cheesecake is particularly useful when planning a party or family meal. Bake and chill the cheesecake one day before it is needed, and prepare the strawberry topping separately. Keep both covered in the refrigerator. Add the fruit topping shortly before serving so the surface looks fresh and the crust remains in its best condition.
A fully assembled cheesecake can be covered and refrigerated for up to three days. Protect it from strong-smelling foods because dairy-based desserts may absorb surrounding aromas. A cake container is ideal, although careful wrapping can also work. Keep the wrapping from touching the strawberry topping, or some of the sauce may lift away when it is removed.
Freezing and Thawing Cheesecake
For longer storage, chill the cheesecake thoroughly before freezing it. Remove the springform pan and its base when this can be done without damaging the crust. Wrap the cheesecake completely in plastic wrap, followed by foil if additional protection is desired. Proper wrapping helps prevent freezer burn and protects the dessert against unwanted freezer odors.
The cheesecake may be frozen for up to four months. Transfer it to the refrigerator approximately 24 hours before serving so it can thaw slowly and evenly. Individual slices can also be wrapped and frozen separately, making it easy to defrost only the amount required. For the most attractive result, consider adding the strawberry topping after thawing.
A Classic Dessert for Any Occasion
This baked strawberry cheesecake delivers the familiar flavor people expect from a classic cheesecake while using a straightforward low-and-slow method. The crunchy graham cracker crust supports a smooth, rich filling, and the homemade strawberry topping adds fresh fruit character. Every layer has a clear purpose, creating a dessert that feels indulgent without becoming overly complicated.
The most important steps are simple: soften the filling ingredients, avoid overmixing the eggs, maintain the low oven temperature, cool the cheesecake gradually, and allow sufficient chilling time. Following these points makes it possible to prepare a creamy strawberry cheesecake without a water bath and serve attractive slices topped with a thick, fruit-filled strawberry sauce.
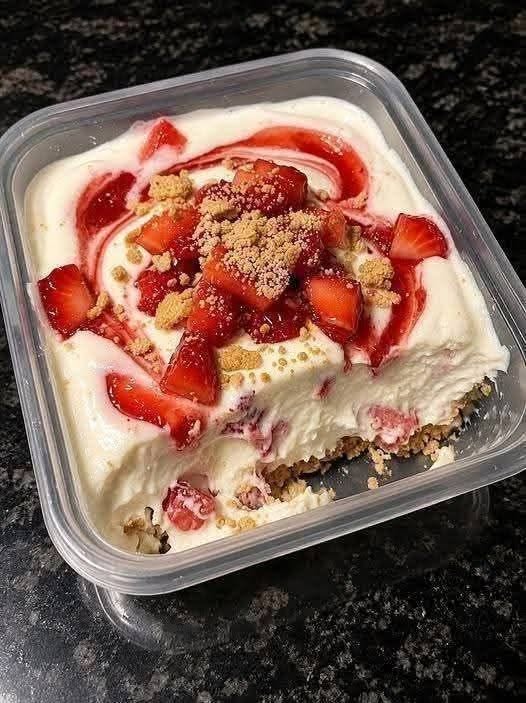
Strawberry Cheesecake Recipe
A rich and creamy baked strawberry cheesecake featuring a buttery graham cracker crust and a thick homemade strawberry topping.
12
servings25
minutes2
hours300
kcal240
minutes6
hours25
minutesIngredients
- Graham Cracker Crust
1 box graham crackers
½ cup butter, melted
⅓ cup brown sugar
1 teaspoon vanilla extract
- Cheesecake Filling
4 (8-ounce) blocks cream cheese, softened
1 (14-ounce) can sweetened condensed milk
1 cup sour cream, room temperature
2 teaspoons vanilla extract
2 teaspoons fresh lemon juice
½ teaspoon salt
¼ cup cornstarch
2 eggs, room temperature
- Strawberry Topping
1 pound strawberries
1 tablespoon lemon juice
½ cup sugar
1 teaspoon vanilla extract
1 teaspoon cornstarch
2 tablespoons water
Directions
- Prepare the Crust
Preheat the oven to 325°F.
Process graham crackers and brown sugar into fine crumbs.
Add melted butter and vanilla; pulse to combine.
Press into a greased 9-inch springform pan.
Bake for 7 minutes.
Reduce the oven temperature to 200°F. - Make the Filling
Beat all filling ingredients except the eggs until smooth.
Add eggs one at a time; mix briefly.
Pour the filling over the crust. - Bake
Bake on the bottom rack for 90–120 minutes.
Keep the oven closed for the first 90 minutes.
Bake until the edges are set and the center jiggles slightly. - Cool and Chill
Open the oven door slightly.
Cool inside the oven for 20 minutes.
Cool completely at room temperature.
Cover and refrigerate for at least 4 hours. - Make the Strawberry Topping
Dice half the strawberries and halve the rest.
Cook diced strawberries, sugar, lemon juice, and vanilla for 5–8 minutes.
Mix cornstarch with 2 tablespoons water.
Stir it into the strawberries and cook for 2 minutes.
Add the halved strawberries.
Remove from heat and cool. - Assemble
Spoon the cooled topping over the chilled cheesecake.
Slice and serve cold.
Nutrition Facts
12 servings per container
- Amount Per ServingCalories620
- % Daily Value *
- Total Fat
36g
47%
- Total Carbohydrate
67g
25%
- Protein 10g 20%
* The % Daily Value tells you how much a nutrient in a serving of food contributes to a daily diet. 2,000 calories a day is used for general nutrition advice.